Stripping the MX5 Part 3: Engine Bay


The engine bay was grubby but then again most are. The cam cover and intake manifold were nicely polished at one point but had began to oxidise, which I'd deal with later on. I wasn't sure where to start first. So I decided the easiest thing to do was to start on the right side of the bay as there were less components and more space to work with. I began by removing the air intake.


With the air intake out the way I removed the custom heat shield for it. I unbolted the screen wash. Unplugged all the wiring on the right side of the bay and again labeling it as I went. I had previously removed both front flip lights as well as the side lights when stripping the front bumper. However I'd left the flip mechanism in place so that now came out.


The AC pulley and pump had already been removed by the previous owner, which meant I didn't have to deal with any nasty gas or remove it. When stripping the interior I'd already taken off the hoses which went to the heater. I simply pulled both, the A/C and heater, through the bulkhead.


I'd forgotten to remove the window wiper motor but I'd eventually get around to taking it out. However at the time I decided to leave the steering pump reservoir attached. I thought it would be easier to drain it off at the same time when I drained the engine oil and transmission fluid.

Next I unplugged and unbolted the radiator and attached fans, having already drained it when I removed the interior heater.


Again the main headlight had already been removed but the wiring and left flip light mechanism were still in place so I removed it and then pushed the cables over the side of the car out of the way.


Off came the coolant reservoir.


Off came the brace bar, charcoal canister, fuel pressure gauge and the accelerator cable. I made sure to label all the hoses so I didn't get confused as to what pipe went where later on.


I'd left the bonnet loosely attached and propped up by a bar to provide shade from the sun while I was working on the engine bay, it also helped keep it dry from the rain. 


Next it was time to get under the car and finish unplugging / unbolting everything connected to the engine and transmission so that they could be lifted out.

Stripping the MX5 Part 2.2: Interior 


After pretty much finishing the carport, aside from the guttering, which I would sort out later on, work on stripping the MX5 could continue.


I carried on with the interior using the help of a useful pdf online MX5 dash removal guide
as well as great book I had: Mazda MX-5 Miata 1.8: Enthusiast's Workshop Manual. I had removed more of the dash the heating / AC control unit, the steering wheel, instrument gauges / dials and then instrument hood. 

I found the instrument hood difficult to remove because after removing all the screws you have to pull it out. Its attached by some arrow shaped trim clips, I had to pull it quite hard to remove it. I was reluctant to pull it too hard as it felt like I was going to snap the plastic.


I removed all the bolts for the main dash board and rocked it back and forth until it began to loosen and eventually come free.


Next I got the blower and A/C units out of the passenger side. Luckily the A/C had already previously been removed from the engine bay so no need to worry about purging the gas.


I then removed the heater unit after the coolant had been drained.


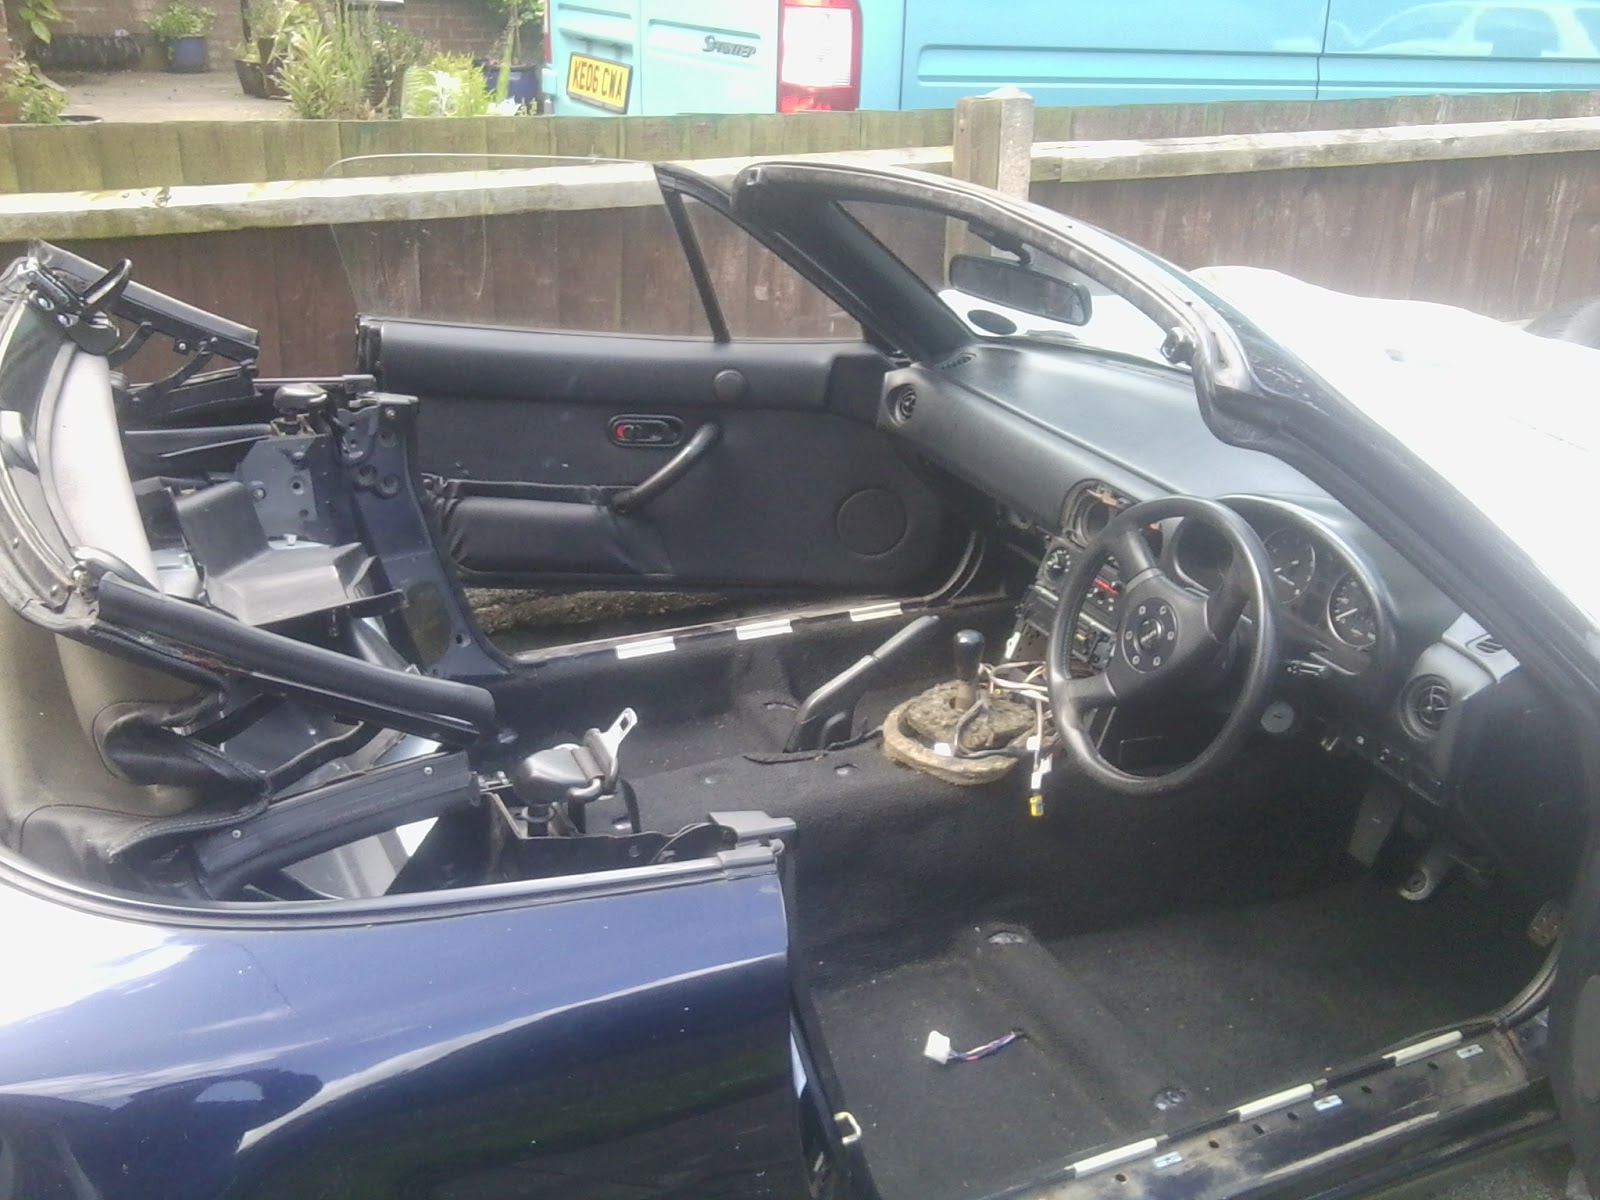
With the heater unit out of the way the main carpet could be removed. I had thought about cutting a line from the gear stick underneath the heater unit to remove it but decided to just wait till it was all out the way.


Next with the carpet out of the way the metal panel in the foot well on the passenger side could be unbolted revealing the ECU behind it. I disconnected and unhooked all the dash wiring, labeling everything as I went.


I ended up with a big ball of wires. It's amazing this is just under a 1/4 of the whole car wiring loom. I'm not sure how its all going to fit into the Roadster yet but I'll have to wait and see.


The gear stick and the gaiter boot was removed for preparation of the engine lift at some point in the future.


I left the doors and the hood on to keep out any rainwater from filling up the foot well. With pretty much all of the interior now removed I could move on to removing the mechanical parts of the car. 

Building a New Home 

                                                                                                                        
I had moved into a new house unfortunately it had no garage as the car was on the bottom of the list for accommodating for, however there was plenty of space for the project on the side of the house.


I had the car transported from the old house to the new one. I briefly considered building a garage on the side of the house next to the MX5. However I decided it would be too expensive and time consuming to build as well as potential planning permission problems (as the house was already heavily extended). I came to the conclusion that a car port would be more suitable.


With the project in mind I pushed the car around performing a 3 point turn. The plan was to build the carport on the side of the house with the MX5 next to it. This would make it to easier to build by having the two cars side by side. I could simply transfer the engine and transmission from the MX5 and drop it straight into the Haynes Roadster chassis.

I covered up the MX5 and began construction of the carport by using some 4" x 4" timber, some concrete and bolt down post supports. I then used masonry screws to fix a support rail to the wall, which I had cut slots into for the 12ft roof beams to fit into. After that I put staggered joints down the center of the roof and painted it all with some fence paint. The total area it covers about 4 and a bit metres by 3.3 metres. 


Having built the carport frame I attached several sheets of corrugated PVC. I also got a semi complete Haynes Roadster chassis, shortly after finishing the roof I popped that under there. 


Approximate Carport Build Cost

Timber (4" x 4" posts and 2" x 4" x 12ft) = £100
Paint = £10
3x post bolt down supports = £21
Postcrete = £10
Timber screws = £5
Concrete bolts = £5
Masonry screws = £10
Drill bit = £5
Plastic corrugate sheets = £85
Corrugate fixings = £10
Flashband = £7
Guttering = £20
Drain piping and soak away gravel = £15

Total = £303

With the car moved and new home built the project could start moving along again.

Stripping the MX5 Part 2.1: Interior 

                                                                                                          
I moved onto stripping the interior. Again I started from the back, as there is less things to remove and worked my way forward. I began by removing the parcel shelf carpet.


Then I removed the seats, starting with the passenger side.


With the seats out of the way I moved onto taking the central console out. I put all the pieces that I didn't need into a big pile that I would eventually get around to selling some day. As I would be using the wiring loom for the build I labelled all the wiring as I went along. I even labelled the bits that I wouldn't be using such as the electric windows so that I would know which wires I could delete later. 


With the seats and central console out of the way I continued stripping bits and labeling wires from the main dash. Eventually work on the car came to a halt as I was in the process of moving house.

Stripping the MX5 Part 1: Body 

                                                                                                                      
Before I started taking everything apart I had to check that the engine was running smoothly; which only had about 79000 on the clock and had previously had a rebuild and had been modified several thousand miles before.

The car had been sitting for a while, so I changed the oil, filter, drained the fuel (as apparently fuel can go bad with time) and then gave the battery a quick charge. I put some fresh fuel in it, turned the key and away she went. It seemed to run really well. Satisfied that the core components were in working order I proceeded to strip the car down.  


I decided that a good place to start was the exterior, removing the damaged bodywork to fully assess the extent of the damage.


Starting from the back I removed the licence plate panel, which was twisted on the right side. The left side light unit was undamaged. Also I removed the rear plastic bumper, which was only slightly damaged with a small crack next to the tail pipe.


The rear driver side was smashed inwards shattering the rear D/S light unit and also shifting the battery inwards. I didn't realise at the time but the battery had a bulge in it from the impact, which I've now replaced obviously.


The most damaged part of the car was at the front on the driver side area (RHD). 


I removed both front wings on each sides, the bumper and then loosened both of the flip lights and the bonnet.


Most of the damage was cosmetic, with some damage to the monocoque chassis. The next step I decided to strip the interior. 

The Background Story


When did it all start?


I've always had a vague interest in cars ever since I was young, I used to enjoy going to car shows, museums and watching car programs on TV. I'm not going to pretend that I'm a car nut or that I have any great knowledge about cars because I don't. I always wanted to have a cool looking sport car growing up and so now that I am... I started casually looking at cheap affordable sports car, as well as ridiculously expensive super cars and dreaming about which ones I would buy if I won the lottery. Anyway one day I came home from work and thought I'd have a look at sports cars again. I was curious to see how much it would cost to buy a factory built Caterham, £20k-£35k depending on the model. I'd heard of Westfield sports cars and I knew that they offered cars similar to the Caterham seven so I decided to check it. The price was £20k, while looking through the site I noticed that they had starter kits for £3.5k to build your own car. What interested me the most was that it required you to source the parts, like the engine, from a donor car such as a Mazda MX5 or a Ford Sierra. 

What made me want to build a kit car?


The idea of building a sports car from bits off another car had never really dawned on me up until I came across the Westfield kit. I had always been amused that kits came with all the pieces. Luckily for me my brother had a MX5 (1994 Japanese import Eunos 1.8L) laying around, which sparked the idea of maybe turning it into a kit car. However I knew very little about kit cars and nothing about how to build one. But still I became fascinated with the possibility of having a cool looking kit car. 

I began searching for kit cars that used the MX5 as I donor. I came across few that really interested me, one in particular, the MEV Exocet. The build process seemed really simple and something that I could manage to do without much know-how. Simply stripping the inside of the car, removing a few nuts and bolts then lifting the body to separate it from the sub-frames and the rest of the running gear. Then bolting a new chassis frame and bodywork onto the sub-frames and running gear and you'd have a fun little kit car. The Exocet kit was very tempting but I didn't like the idea of the cockpit being so exposed to the elements.  This then lead me onto the Mevster, which looked amazing and much more enclosed from the weather. The build process was basically the same as the Exocet and seemed very straight forward. Again very tempting but for me it came down to price/commitment.  Obviously because you get more car it was more expensive than the Exocet; at the time I didn't want invest the money in the kit that I may or may not finish. So I gave up for a while looking at different kits.

Eventually after a few weeks I went back to the classic image that comes to mind when I think of kit car, a Seven type looking car. I wanted to see if there were other kits similar to the one offered by Westfield. I came across the GBS Zero MX5 starter kit, with a price of £2.5k, which was great. However, again I didn't want to buy the kit and then get stuck half way through the build and never finish it. The kit involved a lot more work than the kits from MEV but I liked the look of the Seven car a lot more. I started researching all the work that would be involved in building the kit from youtube video's, blogs and forums. I'd heard of the Locost 7 and references to the book "Build your own sports car for as little as £250" by Ron Champion. I wanted to check it out so I went to the library and found the Haynes Roadster book instead "Build Your Own Sports Car: On a Budget" by Chris Gibbs. This marked an end to the journey for me, I'd found an extremely useful book with a basic build guide that I could use to build a MX5 kit car.

Why the Haynes Roadster?


I finally choose to build a Haynes Roadster, my second choice would have been the GBS Zero MX5, the main reason I chose the Haynes Roadster was the financial commitment. I didn't want to be tied down, with the Haynes Roadster I could buy bits as I went along and that way if at any time I changed my mind I wouldn't have that much money invested in the project. The other reasons being that there was detailed information online on adapting the original Haynes Roadster (based for a Sierra) to fit MX5 running gear, as well as a large community through forums should I get stuck. Lastly after reading the first chapter of the book "Skills Required" and flicking through the others it gave me the encouragement I needed to give it a shot.

The decision to build a kit car was a very slow process but I had finally decided to build a Haynes Roadster. However before making and buying any parts I had to see if the donor car that had been sitting for nearly 2 years would start...

Making a start

                                                                                                                        
Today I've decided it's time for me to get around to creating a diary for my MX5 Haynes Roadster that I'll be building. Yes that's right another blog on a Haynes Roadster build. The main aim of this blog is to keep a record for myself of all the work I've done and will be doing as I go along. In addition I hope that it maybe interesting for others who are perhaps thinking about building a Haynes Roadster or a kit car but aren't sure, hopefully it might offer some encouragement to make the leap. I also hope that it will be useful and informative for those who are already in the process of building an  MX5 kit car, as I've found that other blogs, forums, books, google images and youtube have all been extremely useful so far in the jobs I've done and the jobs that need doing.