Stripping the MX5 Part 4.1: Removing the Engine 

                                                                                                                 
The engine was almost ready to be removed first I had to disconnect everything underneath the car that run to it. I pushed the cables down from the parcel shelf to the bottom of the car, which normally run to the battery. I followed the cables along Power Plant Frame (PPF) unclipping and unplugging as I went.

I moved onto the exhaust pipe system, which is made up of four main sections: the manifold, the down-pipe, CAT and the muffler / silencer with the tip attached.


Cardigan CORGI gas approved engineer.


The muffler section came off easily by unhooking hangers and removing the two bolts on the flange connecting to the CAT. However removing the CAT wasn't as easy, the two flange bolts connecting it to the down-pipe were badly seized. A bit of penetrating oil, time and some force with a breaker bar they eventually came off. 

Things got worse with the down-pipe flange connecting to the manifold. One of the bolts came out but the other turned out to be a nightmare. The bolt went through a bracket connected to the transmission housing, through the down-pipe flange and then through the manifold flange. The head of the bolt was badly corroded when I tried to remove it with a socket set it came out slight then simply crumbled away and quickly became rounded off. Unfortunately the area around the bolt was too tight to fit a drill in, which meant that drilling out the bolt was not an option. 

Cutting was the only real option, but I didn't have anything that would be able to fit in the tight space and cut the nut off. I also didn't want to have to cut through the flange as I needed the manifold for the build and I didn't want to have to repair it later. The only thing holding the exhaust to the engine was a bracket connected to the transmission housing. The only thing I could fit in the space was a junior hacksaw. I must have spent nearly half an hour cutting through the bracket. The limited space meant that only about five of the teeth were actually cutting.

Eventually it came free but the manifold and down-pipe were still attached. I managed to drag the manifold up and rotate it to expose the troublesome bolt. I cut it off finally separating the two sections, headache over for now.


I'd taken off front brace bar and started removing the PPF. I used my book Mazda MX-5 Miata 1.8: Enthusiast's Workshop Manual to help me. Also a really useful video on removing the PPF on youtube: Miata How to: Remove Power Plant Frame (PPF).


The bolts attached to the transmission weren't easy but they came out. The next headache started with the bolts attached to the differential. The bolt closest to the front was difficult but the rear one was impossible. I had managed to loosen it with a breaker bar and continued to turn it until I realised it was just spinning. The mushroom shaped nut on the top had splines and they weren't engaging. I was afraid I might have stripped them making it almost impossible to remove.  I managed to fit an F style clamp in there and clamp down onto the nut. This helped stop it spinning enough to be able to remove the bolt. Examining the nut revealed that some of the splines had been damaged from trying to remove it.

Next was removing the PPF from the car. I used a pry bar to free it from its mounting points. I had to wiggle it around propshaft, which wasn't easy with the lack of working room.


With the PPF gone the only thing left was the propshaft. All four bolts required penetrating oil, heating with a propane torch and a breaker bar. It was unbolted but still attached by rust, one hit with a block of wood and lump hammer and it was free.

Finally the engine could be removed.

Brief Protection

                                                                                                                                                                    Before I took the engine out I noticed that the chassis had some surface rust. So I decided to deal with it before continuing with stripping the MX5. I made the decision to use Loctite Rust Remedy because as I thought it would be the quickest and easiest method to protect from rust. I split the work into 3 stages and brought 3 bottles of the stuff.


I started at the front by using a wire wheel brush to remove the surface rust followed by a quick rub down. Then I brushed on the rust converter, I starts as a milky grey colour and gradually dries to a blueberry colour. Once everything fits and is fully welded the chassis I'll fully spray paint the entire frame.


Stripping the MX5 Part 3: Engine Bay


The engine bay was grubby but then again most are. The cam cover and intake manifold were nicely polished at one point but had began to oxidise, which I'd deal with later on. I wasn't sure where to start first. So I decided the easiest thing to do was to start on the right side of the bay as there were less components and more space to work with. I began by removing the air intake.


With the air intake out the way I removed the custom heat shield for it. I unbolted the screen wash. Unplugged all the wiring on the right side of the bay and again labeling it as I went. I had previously removed both front flip lights as well as the side lights when stripping the front bumper. However I'd left the flip mechanism in place so that now came out.


The AC pulley and pump had already been removed by the previous owner, which meant I didn't have to deal with any nasty gas or remove it. When stripping the interior I'd already taken off the hoses which went to the heater. I simply pulled both, the A/C and heater, through the bulkhead.


I'd forgotten to remove the window wiper motor but I'd eventually get around to taking it out. However at the time I decided to leave the steering pump reservoir attached. I thought it would be easier to drain it off at the same time when I drained the engine oil and transmission fluid.

Next I unplugged and unbolted the radiator and attached fans, having already drained it when I removed the interior heater.


Again the main headlight had already been removed but the wiring and left flip light mechanism were still in place so I removed it and then pushed the cables over the side of the car out of the way.


Off came the coolant reservoir.


Off came the brace bar, charcoal canister, fuel pressure gauge and the accelerator cable. I made sure to label all the hoses so I didn't get confused as to what pipe went where later on.


I'd left the bonnet loosely attached and propped up by a bar to provide shade from the sun while I was working on the engine bay, it also helped keep it dry from the rain. 


Next it was time to get under the car and finish unplugging / unbolting everything connected to the engine and transmission so that they could be lifted out.

Stripping the MX5 Part 2.2: Interior 


After pretty much finishing the carport, aside from the guttering, which I would sort out later on, work on stripping the MX5 could continue.


I carried on with the interior using the help of a useful pdf online MX5 dash removal guide
as well as great book I had: Mazda MX-5 Miata 1.8: Enthusiast's Workshop Manual. I had removed more of the dash the heating / AC control unit, the steering wheel, instrument gauges / dials and then instrument hood. 

I found the instrument hood difficult to remove because after removing all the screws you have to pull it out. Its attached by some arrow shaped trim clips, I had to pull it quite hard to remove it. I was reluctant to pull it too hard as it felt like I was going to snap the plastic.


I removed all the bolts for the main dash board and rocked it back and forth until it began to loosen and eventually come free.


Next I got the blower and A/C units out of the passenger side. Luckily the A/C had already previously been removed from the engine bay so no need to worry about purging the gas.


I then removed the heater unit after the coolant had been drained.


With the heater unit out of the way the main carpet could be removed. I had thought about cutting a line from the gear stick underneath the heater unit to remove it but decided to just wait till it was all out the way.


Next with the carpet out of the way the metal panel in the foot well on the passenger side could be unbolted revealing the ECU behind it. I disconnected and unhooked all the dash wiring, labeling everything as I went.


I ended up with a big ball of wires. It's amazing this is just under a 1/4 of the whole car wiring loom. I'm not sure how its all going to fit into the Roadster yet but I'll have to wait and see.


The gear stick and the gaiter boot was removed for preparation of the engine lift at some point in the future.


I left the doors and the hood on to keep out any rainwater from filling up the foot well. With pretty much all of the interior now removed I could move on to removing the mechanical parts of the car. 

Building a New Home 

                                                                                                                        
I had moved into a new house unfortunately it had no garage as the car was on the bottom of the list for accommodating for, however there was plenty of space for the project on the side of the house.


I had the car transported from the old house to the new one. I briefly considered building a garage on the side of the house next to the MX5. However I decided it would be too expensive and time consuming to build as well as potential planning permission problems (as the house was already heavily extended). I came to the conclusion that a car port would be more suitable.


With the project in mind I pushed the car around performing a 3 point turn. The plan was to build the carport on the side of the house with the MX5 next to it. This would make it to easier to build by having the two cars side by side. I could simply transfer the engine and transmission from the MX5 and drop it straight into the Haynes Roadster chassis.

I covered up the MX5 and began construction of the carport by using some 4" x 4" timber, some concrete and bolt down post supports. I then used masonry screws to fix a support rail to the wall, which I had cut slots into for the 12ft roof beams to fit into. After that I put staggered joints down the center of the roof and painted it all with some fence paint. The total area it covers about 4 and a bit metres by 3.3 metres. 


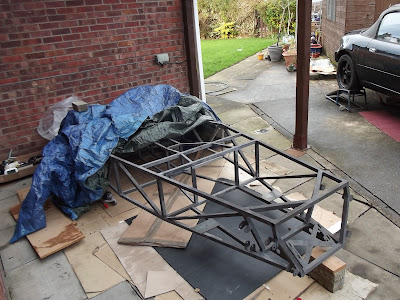
Having built the carport frame I attached several sheets of corrugated PVC. I also got a semi complete Haynes Roadster chassis, shortly after finishing the roof I popped that under there. 


Approximate Carport Build Cost

Timber (4" x 4" posts and 2" x 4" x 12ft) = £100
Paint = £10
3x post bolt down supports = £21
Postcrete = £10
Timber screws = £5
Concrete bolts = £5
Masonry screws = £10
Drill bit = £5
Plastic corrugate sheets = £85
Corrugate fixings = £10
Flashband = £7
Guttering = £20
Drain piping and soak away gravel = £15

Total = £303

With the car moved and new home built the project could start moving along again.

Stripping the MX5 Part 2.1: Interior 

                                                                                                          
I moved onto stripping the interior. Again I started from the back, as there is less things to remove and worked my way forward. I began by removing the parcel shelf carpet.


Then I removed the seats, starting with the passenger side.


With the seats out of the way I moved onto taking the central console out. I put all the pieces that I didn't need into a big pile that I would eventually get around to selling some day. As I would be using the wiring loom for the build I labelled all the wiring as I went along. I even labelled the bits that I wouldn't be using such as the electric windows so that I would know which wires I could delete later. 


With the seats and central console out of the way I continued stripping bits and labeling wires from the main dash. Eventually work on the car came to a halt as I was in the process of moving house.

Stripping the MX5 Part 1: Body 

                                                                                                                      
Before I started taking everything apart I had to check that the engine was running smoothly; which only had about 79000 on the clock and had previously had a rebuild and had been modified several thousand miles before.

The car had been sitting for a while, so I changed the oil, filter, drained the fuel (as apparently fuel can go bad with time) and then gave the battery a quick charge. I put some fresh fuel in it, turned the key and away she went. It seemed to run really well. Satisfied that the core components were in working order I proceeded to strip the car down.  


I decided that a good place to start was the exterior, removing the damaged bodywork to fully assess the extent of the damage.


Starting from the back I removed the licence plate panel, which was twisted on the right side. The left side light unit was undamaged. Also I removed the rear plastic bumper, which was only slightly damaged with a small crack next to the tail pipe.


The rear driver side was smashed inwards shattering the rear D/S light unit and also shifting the battery inwards. I didn't realise at the time but the battery had a bulge in it from the impact, which I've now replaced obviously.


The most damaged part of the car was at the front on the driver side area (RHD). 


I removed both front wings on each sides, the bumper and then loosened both of the flip lights and the bonnet.


Most of the damage was cosmetic, with some damage to the monocoque chassis. The next step I decided to strip the interior.